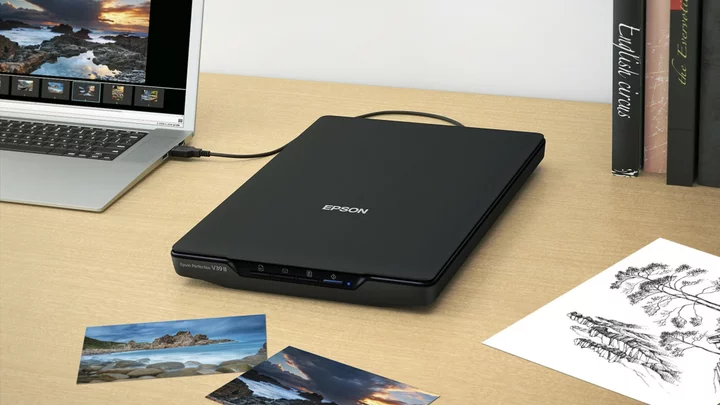
The Epson Perfection V39 II is an upgraded version of the Epson Perfection V39 flatbed scanner that we reviewed back in 2015. Both models are for home users and creative types who need occasional high-quality photo and document scanning. The new V39 II is a close match with its predecessor as far as the physical device is concerned. The updates are mostly on the software side, with new streamlined task processes linked to the scanner’s four onboard buttons, and some new adjustment settings that can help you fine-tune your scans. It’s not a major upgrade, and the V39 II still faces strong competition from other budget-priced photo scanners. Despite that competition, its mix of features and capabilities earns the V39 II our Editors' Choice award for best budget flatbed photo scanner. It replaces the Epson Perfection V39 for that top spot.
Home Scanners: A Competitive Niche
The strong competition includes the Canon CanoScan LiDE 300, the Canon CanoScan LiDE 400, and the Visioneer 7800 Tag That Photo Scanner. Like the V39 II, they are inexpensive flatbed scanners targeted to the needs of home users and creatives. All of these models have a similar size and weight, and all of them scan photos and documents at roughly the same speeds.
The CanoScan LiDE 400 has the same 4,800dpi optical resolution as the V39 II, while the CanoScan LiDE 300 and Visioneer 7800 have lower optical resolutions (2,400dpi and 1,200dpi, respectively). The Visioneer 7800 includes very robust photo management software, though you’ll have to pay an additional fee for that software after the first year. And like the V39 II, the LiDE 300 and LiDE 400 include support for OCR, though neither performed as well on our OCR tests as the V39 II did. The Visioneer 7800 doesn’t support OCR.
We should also mention a new challenger from Epson here. The Epson Perfection V19 II is a slightly scaled-down and less-expensive version of the V39 II. Available only from online retailers, the V19 II provides the same hardware and specifications as the V39 II, though it has fewer software features. Unlike the V39 II, for example, it doesn’t scan directly to cloud services (such as Dropbox, Google Drive, or OneDrive) or stitch scanned images together (for photos or documents too large to fit on the unit’s glass platen).
(Credit: Epson)At 1.5 by 9.9 by 14.4 inches (HWD) and weighing just 3.1 pounds, the V39 II is small enough to place on most desks or tabletops. And if there isn’t enough room, the unit has an integrated kickstand that will let you prop it up into a more vertical position. That can make it more difficult to scan some photos or documents, but it is an option for tight spaces. The Perfection V19 II and the CanoScan LiDE 400 also have an integrated kickstand, while the CanoScan LiDE 300 and the Visioneer 7800 do not.
The V39 II connects to your computer via a supplied USB 2.0 cable that provides both power and data transfer, just like the other models. None of these has Wi-Fi or Ethernet support. And none of them has an ADF for multiple pages. If you need to scan stacks of documents or scan from a different location than where your PC is, this category of scanners is not for you.
The scanner glass on the V39 II can accommodate photos or documents as large as 8.5 by 11.7 inches. That’s big enough to handle letter-size (8.5-by-11-inch) or A4-size (8.3-by-11.7-inch) documents. That maximum document size also matches the other models.
You can remove the V39 II scanner cover, which makes it easier to scan books or unusually thick documents. If you need to scan something larger in size (like a poster, for example), the provided Epson ScanSmart software lets you seamlessly stitch multiple scans together. The CanoScan LiDE 300 and the CanoScan LiDE 400 also support image stitching for large-scale scans.
The final notable physical feature on the V39 II is an array of four buttons. Those buttons are the only outward difference between the original V39 and the new V39 II, and that slight difference is easy to miss. The V39 buttons are labeled Start, PDF, Copy, and Send; while the V39 II buttons are labeled Start, PDF, Copy, and Email. The V19 II has a button configuration that’s identical to the V39 II. By contrast, the Visioneer 7800 has only one button to power the scanner on and off. The CanoScan LiDE 300 and the CanoScan LiDE 400 have five buttons for Start, Finish, Auto Scan, Copy, and Send.
Scanning With the Epson V39 II: Automation, if You Want It
Setting up the V39 II is easy and straightforward. You’ll need to unpack the unit and remove the tape that secures the scanner for shipping. Before you attach the USB 2.0 cable to connect the V39 II to your computer, you’ll need to first download and install the software and drivers via a supplied link. As you install the software, it will let you know when to connect the scanner to your computer. It will also step you through a test scan. Then you’ll be ready to go.
(Credit: Epson)The two main software applications are Epson ScanSmart and Epson Scan 2. You'll also find an Epson Scan Utility 2, which lets you switch between scanners if you have more than one installed. Also included is an Epson Software Updater app. And finally, you'll find a Perfection V19 II and V39 II Guide. It shows up on your Windows desktop as an application icon, through it’s actually a shortcut that calls up a browser link to the online user guide.
The Epson ScanSmart app is designed for both beginners and intermediate users. It defaults to an Auto Mode that detects the type (photo or document) and color of the original, and then automatically adjusts the settings to suit the scanned material. It worked fine every time in detecting whether I was scanning a photo or document, but it wasn’t always able to determine if a photo was shot in landscape or portrait mode. The Auto Mode also defaults to lower scanning resolutions than you may prefer.
Instead, you can switch from ScanSmart’s Auto Mode to either a dedicated Document Mode or Photo Mode. The Document Mode lets you bump up the scan resolution, switch to black-and-white scanning, or rotate the scan. The Photo Mode gives you access to some photo editing tools, such as the ability to rotate or crop an image, apply automated color enhancement, restore faded color, or remove red eye. The photo editing features are very limited, but useful to have when scanning, because you can preview the results before you save the file.
(Credit: Epson)If you want even more control over the scanning process for either documents or photos, you’ll want to check out the advanced settings inside the Epson Scan 2 app. With its Document Mode, you’ll be able to adjust brightness, contrast, and gamma; enhance the text; or fill in edges to remove the shadow effect. With the Photo Mode, you’ll be able to de-screen the image to remove ripples from moiré patterns, eliminate dust from a scanned photo, or sharpen the outlines of the image.
Because you can initiate a scan from either Epson ScanSmart or Epson Scan 2, you can choose just how you want each scan to be treated. However, if you initiate a scan using one of the four onboard buttons, you’ll be automatically routed to a specific section of the ScanSmart app. Since it's the most relevant section to the type of scan you're performing, beginners and non-techies may prefer to use the onboard buttons to initiate a scan, as opposed to initiating a scan from either of the apps.
(Credit: Epson)What happens when you press the buttons? The Start button brings up the Document Editing Mode or the Photo Editing Mode, depending on whether you’re scanning a document or photo. Pressing the PDF button brings you to the same sections. The Copy button brings up the Print Settings screen. And the Email button brings up the Attach to E-mail Settings screen.
The subsequent screens will vary depending on the use case and intended destination. With the PDF button, for example, you’ll have the option to save the file to your computer, print the file with a connected printer, attach the file to an email, or upload the file to an online service (either Google Drive, Dropbox, Evernote, or OneDrive).
While the latest version of the software will seem familiar to anyone who has used the original V39, Epson has restructured and streamlined the software to make it simpler to navigate. The previous version was structured around the hard-to-define categories of Home Mode, Office Mode, and Professional Mode. The new structural categories of Auto Mode, Document Mode, and Photo Mode are more intuitive and easier to understand.
(Credit: Epson)The new streamlining is targeted mostly to non-techies who just want get the job done, without having to ask for help. Basic tasks now take less time and require fewer steps to complete. For example, the V39 II has reduced the scan-to-PDF process to just two steps (press the button to start the scan, and then check the image and settings on a single ScanSmart screen before pressing finish). With the V39, that same process had an extra step. Similarly, when copying a scan to a printer or when attaching a scan to an email, the previous five steps have been reduced to just two.
You'll also find some additional settings and capabilities within the software that weren’t there previously. A new Dual Image Output option lets you scan a document twice with different output settings. A new Gray Balance Intensity setting helps you to compensate for unusual lighting situations that cause some colors to be too strong. And a new Remove Background option lets you remove distracting background elements from your scanned document.
Like the original V39, the V39 II has only minimal support for OCR. You can save your scan as a searchable PDF (sPDF) that will include access to the text, but the V39 II software can’t directly save that text as a Word file or text file. Fortunately, it’s easy enough to copy text from an sPDF and paste it wherever you want.
Testing the Epson V39 II: Timely Input
Epson claims that the V39 II can scan a letter-size color document in approximately 10 seconds when using the 300dpi setting. That time increases to approximately 20 seconds when the scan resolution increases to 600dpi, according to Epson.
As you would expect, those are best-case scenarios. In addition to being affected by the scan resolution, scan speeds can vary widely depending on the type of content that you’re scanning, such as text documents, mixed-text-and-graphics documents, or photographs. Whether you’re scanning in color or black-and-white can also affect scan speeds.
I ran my tests with the Epson ScanSmart and Epson Scan 2 software over a USB connection to our Intel Core i5 testbed PC running Windows 10 Pro. All scans were implemented as color scans. I was able to scan a text document at 300dpi in 11.2 seconds. When I bumped up the resolution to 600dpi, that time increased to 28.2 seconds. When I scanned an 8.5-by-11-inch color photo using ScanSmart’s default non-defined resolution, the scan took 16.4 seconds to complete. Scanning that same color photo in Epson Scan 2 using its 300dpi setting increased the time to 39.0 seconds. And when I bumped up the resolution to 600dpi in Epson Scan 2, that same photo took 54.5 seconds to complete.
(Credit: Epson)Those scan times may seem slow, but they’re fairly typical for a budget-priced flatbed scanner. The Canon CanoScan LiDE 300, the Canon CanoScan LiDE 400, and the Visioneer 7800 Tag That Photo Scanner all have roughly the same top speed at 300dpi (varying from 10.9 to 13.3 seconds). If you need faster scan speeds, especially at higher resolutions, where the time differences really matter, you should be prepared to pay more for a more capable scanner.
Our test results of the OCR capability were especially impressive. They also matched our OCR tests for the original V39. With both the V39 and V39 II, our Times New Roman and Arial font test pages were recognized in sizes as small as 6 points without a mistake. Six-point OCR accuracy is the kind of accuracy that’s associated with more expensive business-oriented document scanners, such as the Fujitsu ScanSnap iX1600 and the Brother ADS-4900. The CanoScan LiDE 300 and the CanoScan LiDE 400 were able to attain similar OCR test results, but only when we bypassed the provided software. Otherwise, their OCR accuracy with the Arial font was limited to 10 points.
(Credit: Epson)Photo scan quality was excellent throughout a wide variety of scans. The colors were accurate, though consistently a tad oversaturated. Accordingly, you may want to adjust the saturation down just a bit. The contrast levels were consistently spot on. Sharpness and detail levels were pleasing and well-balanced. And the three Photo Enhancements performed well. They are Auto Color Enhance, Restore Faded Colors, and Remove Redeye. You could leave them on with the assumption that they’ll engage only as needed. On the other hand, Epson has all three initially switched off, which is probably the better approach.
I was able to successfully scan multiple photos at the same time, as long as I positioned them on the glass platen with at least a 1-inch gap between the photos. Once they’re automatically separated by the scanning software, you’ll be able to apply the advanced settings independently to each photo.
The document scans were clean and sharp with no color fringing. That was the case even when the text documents included images or some colored text. As the OCR test results indicate, the text characters were properly formed with only a minimal number of stray pixels.
Verdict: A Fine Refinement of a Proven Scanner
Even though the improvements for the Epson Perfection V39 II over the previous V39 are mostly on the software side, those changes could be especially worthwhile for people who are just starting out with scanning. Epson has the unenviable task of having to structure the software interface to appeal to both beginners and experienced users. Beginners will benefit from the new simplified steps and instructions, while experienced users will have additional settings to enhance their scanned photos and documents.
The V39 II faces strong competition from the Canon CanoScan LiDE 300, the Canon CanoScan LiDE 400, and the Visioneer 7800 Tag That Photo Scanner, as well as its new sibling, the Epson Perfection V19 II. They are all worth considering, as you'll find a significant amount of variation in their features and capabilities. However, the Epson Perfection V39 II’s high-resolution 4,800dpi scan engine, superior OCR accuracy, and streamlined task processes put it out in front enough to make it our Editors' Choice pick.


