Of course, anyone can build their own PC. But did you know you can build your own PC case, too? Cooler Master’s Qube 500 Flatpack is poised to heat up the market for compact PC cases with the quality, performance, and flexibility you’d expect to find in a factory-assembled case. Those who didn’t know that a "build your own case" market existed can look to our In Win Airforce review as a recent taste of this rare breed, and see some of the areas that Cooler Master was hoping to improve in the Qube 500’s design. We think the company succeeded, with an attractive, fun aesthetic that comes in several colors, can host full-ATX motherboards and full-size power supplies, and delivers above-average value (and lots of fun!) for the money. We crown the Qube with our Editors' Choice honors for a budget creative-project chassis.
The Design: Go On, Build Me a Chassis
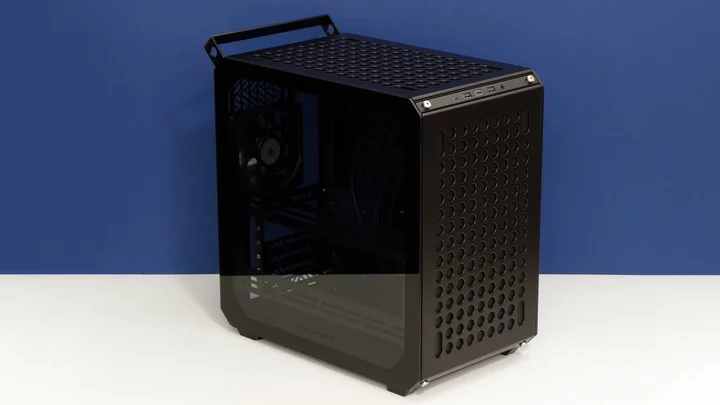
Though the Qube 500 arrived flatpacked, we suspect potential buyers will want to see what the finished box looks like before reading further. So we'll skip ahead in time and start off by showing off the assembled chassis, and roll back to the parts presentation later.
We received the black version of the case; Cooler Master also offers a pure white model for the same price, as well as a pricier ($99.99) Qube 500 Macaron version that comes with contrasting side panels, with the main chassis frame and interior in white, and the panels in pastel mint, cream, and pink. The front and top panels feature removable fascia with dust covers attached to their underside. A removable handle is at the top of the back panel, and a glass side panel covers an opening that also supports an optional swinging radiator bracket.
Looking more closely at the front/top edge bevel, we see a single USB Type-C port and two USB Type-A ports, a power button with an LED power-indicator ring, and a headphone/microphone combo jack.
(Credit: Thomas Soderstrom)Around back we see a power plug for the internal power supply mount’s extension cable (more about PSU mounting later), a standard seven-slot expansion-card bracket with all of its separator bars omitted to allow vertical graphics-card mounting, and a factory 120mm exhaust fan. (Cooler Master’s promotional material claims that a 140mm fan will fit here, but we don’t see a place to put it.) You will have to provide your own riser cable for vertical card mounting.
(Credit: Thomas Soderstrom)Removing the side panels and the front and top faces exposes a plethora of fan mounts, with the removable side bracket holding up to two 140mm fans (the same as the top, bottom, and front panels).
(Credit: Thomas Soderstrom)The top also has a set of holes for installing a 3.5-inch drive on vibration-damping rubber grommets. Though only around 52mm of vertical space extends above the motherboard for closed-loop coolers, the mounts also provide around 48mm of horizontal clearance to allow thicker cooling solutions to clear onboard components. (Subtract 20mm from that for 140mm- or 280mm-format coolers.)
(Credit: Thomas Soderstrom)The area behind the motherboard supports another 3.5-inch drive, or two 2.5-inch drives, again on grommeted holes. Holes for mounting a third 2.5-inch drive are hidden way up behind the bottom corner of the front panel.
(Credit: Thomas Soderstrom)So, What's Actually in the Flatpack?
The Qube 500 comes in a low, square box resembling a case of floor tiles. The basis of the Qube 500 is a 3D motherboard tray, shown facing down next to the power supply mounting bracket below...
(Credit: Joseph Maldonado)After noticing the generous amount of cable storage space, we get a better look at the two 2.5-inch drive mounts (behind the motherboard’s bottom, top of photo) as well as the extra holes that allow a 3.5-inch drive to be placed there instead. A third 2.5-inch drive mount is still barely discernable, tucked into the tray’s bottom front corner (shown in the top right corner in the image above). Also note the other end of the AC extension cable for the internal power supply bay.
In the image below, the carry handle makes the back panel appear longer than the front panel, but it’s removable. Like the carrying handle, the port section is factory-mounted to the top edge of the front panel.
(Credit: Joseph Maldonado)The top and bottom panels are interchangeable, and that means that users can build the Qube 500 upside-down if they prefer. The reason you might want to do that? Some builders prefer to have their glass showcase side on the right, with their motherboard upside-down. (At least then it’s easier to see the fans on your graphics card, no?)
(Credit: Joseph Maldonado)You can also leave the case in the expected orientation and swap the side panels, having the panel that normally goes behind the motherboard tray mounted over the motherboard. Doing this provides ventilation to the optional swinging side radiator mount.
(Credit: Joseph Maldonado)We can’t think of a good reason to put glass on the ugly side of the case, but that might be necessary if you swapped the vented panel for the reason we just mentioned. Most of us will be using this panel in the conventional place on the open side, so that we can see our pretty RGB memory modules, or at least our motherboard’s indicator lights.
(Credit: Joseph Maldonado)Building Up (and With) the Qube 500
The Qube 500 comes packed with an installation guide, 10 ratcheting cable ties, four case feet, a pack of #6-32 (imperial) screws, a pack of standoffs and drive mounting pins, enough rubber grommets to accommodate five drives, and a vertical graphics card bracket. Drive pins are headless and simply push into the holes of grommets, secured via friction.
(Credit: Thomas Soderstrom)The interior cables include HD Audio for the headphone/mic combo jack, a front-panel power button/power LED combo cable, a USB 3.2 Gen 1 cable for the two Type-A ports, and a USB 3.2 Gen 2x2 cable for the Type-C port.
(Credit: Thomas Soderstrom)We mounted our motherboard and power supply onto the motherboard-tray base before building the case around these parts. Notice that there’s extra space on the power supply bracket that enables it to hold larger, PS/2-style full-size ATX12V units. (We used an SFX model.)
(Credit: Thomas Soderstrom)We added the back panel and our graphics card before finishing working our way around the case to complete it.
(Credit: Thomas Soderstrom)Front and rear panels are secured to the motherboard tray with four screws, while top and bottom panels are secured to the tray using only hook tabs. Two screws each of the top and bottom panel secure the outer corners to the front and back panels.
(Credit: Thomas Soderstrom)Notice that the Qube 500 is very compact despite being full ATX. That’s partly because its power-supply mounting area is up front, with the option to relocate it to the bottom panel. Front-mounting the power supply accommodates ATX motherboards and allows for EATX motherboard support with boards that are barely larger than ATX, which isn’t usually a problem since EATX “gaming” motherboards tend to be less than 11 inches deep. Conversely, moving the power supply to the bottom restricts motherboard space to MicroATX proportions.
Note that using a full-ATX power supply in the front position will keep you from mounting any front fans along the inside front of the case. It may also interfere with a video card that's more than 11 inches long.
(Credit: Thomas Soderstrom)Here you can see the Qube 500 built out. If you prefer to limit your lighting to just a few highlights, the black version of the Qube 500 might be a good choice. Heck, as you can see above, it just might be a great choice! If you want the colorful panels of the Macaron version, though, we don't see an option yet for acquiring other-color panels separately just yet.
Testing the Cooler Master Qube 500: Airy Enough for Assemble-It-Yourself
So here's a quick recap of the standard test components we use in ATX cases...
In our tests, the Qube 500 takes third place for CPU temperature in a tight race between similarly shaped cases, but it falls behind the similarly ventilated Fractal Design North and the similarly themed In Win Airforce. That makes more sense when we consider that both the North and the Airforce were factory-equipped with intake fans, while our Qube 500 build is negative pressure. (All fans are exhausts.)
The proximity of our closed-loop CPU cooler’s fans to the motherboard’s voltage regulator does favors for the Qube 500’s voltage-regulator cooling numbers, and the addition of a 120mm exhaust fan of its own probably helped as well.
You usually want an intake fan to keep your GPU cool, though we’ve seen some impressive design workarounds in previous reviews. The Qube 500 doesn’t force air past the graphics card, but it still only keeps our card a few degrees hotter than those that do. Not bad for a compact case like this.
The Qube 500’s noise numbers don’t completely make sense to us, since it has but one exhaust fan that isn’t anywhere close to the points at which we place our meter, but at least it didn’t lose this test. That notoriety goes to the In Win Airforce in this test lot.
Verdict: Great Fun and Value, if You're Keen on a Project
Most of what Cooler Master puts forth as the rationale for producing its Qube 500 as a flat-packed enclosure involves shipping-material reductions, and the pride of building it yourself: not just the PC, but the case itself, too. The latter makes it super-suited to a family weekend project, as an engaging way to introduce a child or a teen to PC building. At the very least, the youngest helper can sort parts, screw together the case frame, and snap on the panels, even if the finer work of cabling or header pins is beyond them.
Of course, if you're not in the DIY mindset and don't have an IKEA build-it itch to scratch with a screwdriver, that all may sound like something a third-grade arts-and-crafts instructor would say. And indeed, there isn't that much to the actual case build; experienced PC-building hands won't get much stimulation from so simple a task. Still, there's that $79.99 price and the idea of saving on some packaging to pique your interest, even if the chassis-assembly aspect just seems an extra chore. The design proportions and the configurability of the Qube 500, paired with the price, do win us over, charming even this jaded observer of PC cases.